Tuesday, September 05, 2006

VMware ESX 3.0.0 SAN Booting

One of the ways enterprises today with large numbers of servers are reducing costs and enable greater storage consolidation is by deploying diskless servers that boot from the SAN (FC or IP). While this technique is not new, the introduction of the Bladeserver, which provides greater manageability, reduced HW costs, simpler cable management as well as providing power, cooling and real-estate savings, has further accelerate the adoption of SAN booting.

Booting from the SAN provides several advantages:


  • Disaster Recovery - Boot images stored on disk arrays can be easily replicated to remote sites where standby servers of the same HW type can boot quickly, minimizing the negative effect a disaster can have to the business.
  • Snapshots - Boot images in shapshots can be quickly reverted back to a point-in-time, saving time and money in rebuilding a server from scratch.
  • Quick deployment of Servers - Master Boot images stored on disk arrays can be easily cloned using Netapp's FlexClone capabilities providing rapid deployment of additional physical servers.
  • Centralized Management - Because the Master image is located in the SAN, upgrades and patches are managed centrally and are installed only on the master boot image which can be then cloned and mapped to the various servers. No more multiple upgrades or patch installs.
  • Greater Storage consolidation - Because the boot image resides in the SAN, there is no need to purchase internal drives.
  • Greater Protection - Disk arrays provide greater data protection, availability and resiliency features than servers. For example, Netapp's RAID-DP functionality provides additional protection in the event of a Dual drive failure. RAID-DP with SyncMirror, also protects against disk drive enclosure failure, Loop failure, cable failure, back-end HBA failure or any 4 concurrent drive failures

Having mentioned the advantages, it's only fair that we also mention the disadvantages which even though are being outnumbered they still exist:

  • Complexity - SAN Booting is a more complex process than booting from an internal drive. In certain cases, the troubleshooting process may be a bit more difficult especially if a coredump file can not be obtained.
  • Variable Requirements - The requirements and support from array vendor to array vendor will vary and specific configurations may not even be supported. The requirements will also vary based on the type of OS that is being loaded. Always consult with the disk array vendor before you decide to boot from the fabric.

One of the most popular platforms that lends itself to booting from the SAN is VMware ESX server 3.0.0. One reason is that VMware does not support booting from internal IDE or SATA drives. The second reason is that more and more enterprises have started to deploy ESX 3.0.0 on diskless blade servers consolidating hundreds of physical servers into few blades in a single blade chassis with the deployment of VMware's server virtualization capabilities.

The new ESX 3.0.0 release has made significant advancements in supporting boot from the SAN as the multiple and annoying requirements from the previous release have been addressed.

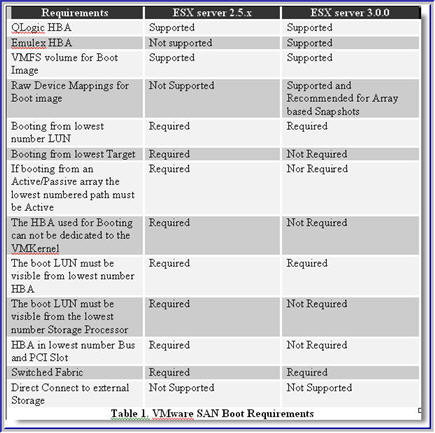
Here are some differences between the 2.5.x and 3.0.0 versions with regards to the SAN booting requirements:


If you are going to be booting ESX server from the SAN, I highly recommend that prior to making any HBA purchasing decisions, you contact your storage vendor and carefully review VMware's SAN Compatibility Guide for ESX server 3.0 . What you will find is that certain model Emulex and Qlogic HBAs are not supported for SAN booting as well as certain OEM'd/rebranded versions of Qlogic HBAs.

The setup process is rather trivial, however there are some things you will need to be aware of in order to achieve higher performance, and non-disruptive failovers should HW failures occur:

1) Enable the BIOS on only 1 HBA. You only need to enable the BIOS on the 2nd HBA should you have a need to reboot the server while either the original HBA used for booting purposes, the cable or the FC switch has failed. In this scenario, you would use Qlogic's Fast!UTIL to select the Active HBA, enable the BIOS, scan the BUS to discover the boot LUN, and assign the WWPN and LUN ID to the active HBA. However, when both HBA connections are functional only one needs to have its BIOS enabled.

2) One important option that needs to be modified is the Execution Throttle/Queue Depth which signifies the maximum number of Outstanding commands that can execute on anyone HBA port. The default for ESX 3.0.0 is 32. The value you use is dependent on a couple of factors:

  • Total Number of LUNs exposed thru the Array Target Port(s)
  • Array Target Port Queue Depth

The formula to determine the value is: Queue Depth = Target Queue Depth / Total number of LUNs mapped. This formula will guarantee that a fast load on every LUN will not flood the Target Port resulting in QFULL conditions. For example, if a Target Port has a queue depth of 1024 and 64 LUNs are exposed thru that port then the Queue Depth on each host should be set to 16. This is the safest approach and guarantees no QFULL conditions because 16 LUNs x 64 = Target Port Queue Depth

If using the same formula, you only consider LUNs mapped to one Host at a time then the potential for QFULL conditions exists. Using the above example, lets assume that we have a total of 64 LUNs and 4 ESX hosts each of which has 16 LUN mapped.

Then the calculation becomes: Queue Depth = 1024 / 16 = 64. But a fast load on all 64 LUNs produces: 64 x 64 = 4096 which is much greater than Queue Depth of the Physical Array Target Port. This will most certainly generate a QFULL condition.

As a rule of thumb, after the queue depth calculation, always allow some room for future expansion, in case more LUNs need to be created and mapped. Thus, consider setting the queue depth value a bit lower than the calculated one. How low is strictly dependent on future growth and requirements. As an alternative you could use Netapp's Dynamic Queue Depth Management solution which allows queue depth management from the array side rather than the host.

To Change the Queue Depth on a Qlogic HBA:

2a) Create a copy /etc/vmware/esx.conf

2b) Locate the following entry for each HBA:

/device/002:02.0/name = "QLogic Corp QLA231x/2340 (rev 02)"

/device/002:02.0/options = ""

2c) Modify as following:

/device/002:02.0/name = "QLogic Corp QLA231x/2340 (rev 02)"

/device/002:02.0/options = "ql2xmaxqdepth= xxx"

2d) Reboot

Where xxx is the queue depth value.

3) Another important option that will need modification using Fast!UTIL is the PortDownRetryCount parameter. This value will need to be set to the value recommended by your storage vendor. This setting specifies the number of times the adapter's driver retries a command to a port returning port down status. This value for ESX server is 2* n+5. Where n is the value of PortDownRetryCount from the HBA BIOS. You can change this value directly in the HBA or you can do it after you've installed ESX by editing the /etc/vmware/esx.conf file. Upon editing the file, locate the "options=" entry under the HBA model you are using and make the following change:

3a) Create a copy of /etc/vmware/esx.conf

3b) Locate the following entry for each HBA:

/device/002:02.0/name = "QLogic Corp QLA231x/2340 (rev 02)"
/device/002:02.0/options = ""

3c) Modify as following:

/device/002:02.0/name = "QLogic Corp QLA231x/2340 (rev 02)"
/device/002:02.0/options = "qlport_down_retry= xxx"

3d) Reboot

Where xxx is the value recommended by your storage vendor. The equivalent setting for Emulex HBAs is "lpfc_nodedev_tmo". The default is 30".


In closing, before you decide what your setup will be, you will need to decide whether or not booting from the SAN makes sense for you and whether your storage vendor supports the configuration(s) you have in mind. In general, if you do not want to independently manage large server farms with internal drives, if you are deploying diskless blades or if you would like to take advantage of Disk array based snapshots and cloning techniques for rapid recovery and deployement then you are a candidate for SAN booting.

IBM Bladecenter iSCSI Boot Support

There has been a lot of demand lately to boot blade servers using the integrated NICs without the use of iSCSI HBAs.

IBM has partnered with Microsoft to enable this capability for the IBM HS20 (Type 8843) Blades and Netapp has recently announced support for it.

Here are the requirements:

Blade type: HS20 MT8843
BIOS: 1.08
HS Blade Baseboard/Management Controller: 1.16
Windows 2003 SP1 w/ KB902113 Hot Fix
Microsoft iSCSI initiator with Intergrated boot support: 2.02
Netapp DataONTAP: >= 7.1.1
Netapp iSCSI Windows Initiator Support Kit 2.2 (available for download from the Netapp NOW site)

One thing to be aware of is that the Microsoft iSCSI initiator version 2.02 with Integrated Boot support is a different binary from the standard Microsoft iSCSI initiator 2.02.

To obtain the MS iSCSI initiator 2.02 with Boot support binary follow the link and provide the following invitation code: ms-8RR8-6k43

The IBM BIOS and BMC updates can be downloaded from here:
www-307.ibm.com/pc/support/site.wss/document.do?lndocid=MIGR-64042 or here

http://www-03.ibm.com/servers/eserver/support/bladecenter/hs20/downloadinghwwindows.html

You can find instructions for the process here:

ftp://ftp.software.ibm.com/pc/pccbbs/pc_servers_pdf/iscsi_boot_san_configuration_guide.pdf

Thursday, August 31, 2006

Linux Native Multipathing (Device Mapper-Multipath)

Over the past couple of years a flurry of OS Native multipathing solutions have become available. As a result we are seeing a trend towards these solutions and away from vendor specific multipathing software.

The latest OS Native multipathing solution is Device Mappper-Multipath (DM-Multipath) available with Red Hat Enterprise Linux 4.0 U2 and SuSE SLES 9.0 PS2.

I had the opportunity to configure it in my lab a couple of days ago and I was pleasantly surprised as to how easy was to configure it. Before I show how it's done, let me talk a little about how it works.

The multipathing layer sits above the protocols (FCP or iSCSI), and determines whether or not the devices discovered on the target, represent separate devices or whether they are just separate paths to the same device. In this case, Device Mapper (DM) is the multipathing layer for Linux.

To determine which SCSI devices/paths correspond to the same LUN, the DM initiates a SCSI Inquiry. The inquiry response, among other things, carries the LUN serial number. Regardless of the number paths a LUN is associated with, the serial number for the LUN will always be the same. This is how multipathing SW determines which and how many paths are associated with each LUN.

Before you get started you want to make a sure the following things are loaded:

  • device-mapper-1.01-1.6 RPM is loaded
  • multipath-tools-0.4.5-0.11
  • Netapp FCP Linux Host Utilities 3.0

Make a copy of the /etc/multipath.conf file. Edit the original file and make sure you only have the following entries uncommented out. If you don't have Netapp the section then add it.


defaults {
user_friendly_names yes
}
#
devnode_blacklist {
devnode "sd[a-b]$"
devnode "^(ramrawloopfdmddm-srscdst)[0-9]*"
devnode "^hd[a-z]"
devnode "^cciss!c[0-9]d[0-9]*"
}


devices {
device {
vendor "NETAPP "
product "LUN"
path_grouping_policy group_by_prio
getuid_callout "/sbin/scsi_id -g -u -s /block/%n"
prio_callout"/opt/netapp/santools/mpath_prio_ontap /dev/n"
features "1 queue_if_no_path"
path_checker readsector0
failback immediate
}
}

The devnode_blacklist includes devices for which you do not want multipathing enabled. So if you have a couple of local SCSI drives (i.e sda and sdb) the first entry in the blacklist will exclude them. Same for IDE drives (hd).


Add the multipath service to the boot sequence by entering the following:

chkconfig --add multipathd
chkconfig multipathd on


Multipathing on Linux is Active/Active with a Round-Robin algorithm.

The path_grouping_policy is group_by_prio. It assigns paths into Path Groups based on path priority values. Each path is given a priority (high value = high priority) based on a callout program written by Netapp Engineering (part of the FCP Linux Host Utilities 3.0).

The priority values for each path in a Path Group are summed and you obtain a group priority value. The paths belonging to the Path Group with the higher priority value are used for I/O.

If a path fails, the value of the failed path is subtracted from the Path Group priority value. If the Path Group priority value is still higher than the values of the other Path Groups, I/O will continue within that Path Group. If not, I/O will switch to the Path Group with highest priority.

Create and map some LUNs to the host. If you are using the latest Qlogic or Emulex drivers, then run the respective utilities they provide to discover the LUN:


  • qla2xxx_lun_rescan all (QLogic)
  • lun_scan_all (Emulex)

To view a list of multipathed devices:

# multipath -d -l

[root@rhel-a ~]# multipath -l

360a9800043346461436f373279574b53
[size=5 GB][features="1 queue_if_no_path"][hwhandler="0"]
\_ round-robin 0 [active] \
\_ 2:0:0:0 sdc 8:32 [active]
\_ 3:0:0:0 sde 8:64 [active]
\_ round-robin 0 [enabled]
\_ 2:0:1:0 sdd 8:48 [active]
\_ 3:0:1:0 sdf 8:80 [active]

The above shows 1 LUN with 4 paths. Done. It's that easy to set up.

Friday, August 18, 2006

VMware ESX 3.0.0

Over that past couple of i've started playing with the newly released version (3.0.0) of ESX Server. I've been running ESX 2.5.3 in my lab for a while now and so I decided to upgrade to 3.0.0 to get a feel of the new changes made. More importantly I wanted to see the iSCSI implementation.

I've been booting ESX 2.5.3 over an FC SAN in my lab and I have a few Windows 2003 virtual machines as well as a RHEL 4.0U2 virtual machine. The upgrade process took me about 30 minutes and was flawless.

Setting up the ESX iSCSI SW initiator was a breeze and after I was done I connected my existing VMs via iSCSI thru the ESX layer. Because there's no multipathing available for iSCSI as there is with Fibre Channel with the 3.0.0 release I used NIC Teaming to accomplish virtually the same thing. The whole process didn't take more than 10-15 minutes.

With the 3.0.0 version of ESX, VMware does not support booting ESX server over iSCSI, however, they do support VM's residing on iSCSI LUNs. Even though you could connect an iSCSI HBA (i.e Qlogic 4010/4050/4052) and boot the ESX server, the status of the iSCSI HBA for this release is deemed "experimental only". Support for the iSCSI HBA should be in the 3.0.1 release. I also hear that iSCSI multipathing support will also be available on this release as well.

So if you have a whole nunch of diskless blades you want to boot over iSCSI with VMware ESX you'll be able to get it done in the 3.0.1 release.

I also noticed that some of the restrictions in terms of suported FC HBAs for SAN booting have been lifted with the 3.0.0 release. For example, you can now use Emulex & Qlogic HBAs whereas before only Qlogic 23xx was supported. Additionally, RDMs (Raw Device Mappings) are now supported in conjuction with SAN booting whereas before they were not.

Further restrictions with regards to SAN booting that have been lifted, also include booting from the lowest number WWN, and lowest number LUN. The restriction that remains is that you can not boot ESX without a Fabric, meaning you can't boot ESX via a direct connection to a disk array. Well, I believe you can it's just that VMware won't support it.

One thing though that I have yet to figure out is why would VMware allow and support an ESX install on internal IDE/ATA drives but not on internal SATA drives. I've tried to install ESX on a server with an Adaptec 1210SA controller and during setup it couldn't find my disk. So it looks like a driver issue. Poking around on the net I found someone who used an LSI MegaRaid 150-2 controller and was successful in installing ESX on a SATA RAID 5 partition.

That made me curious so I spent $20 on Ebay and got an LSI Megaraid 150-2 controller and was successful in installing ESX. Like I said before, this is not supported by VMware which is bizarre but for testing purposes it works just fine.

One thing to watch out for is that:
  • VMware does not currently support MSCS with Windows 2003 SP1. SP1 has incorporated some changes that will not allow MSCS to fuction properly with any ESX version at this time. VMware has been working with Microsoft on a resolution but have no ETA for a fix

Thursday, August 17, 2006

Back from vacation

I haven't written for a while since my family and I went on vacation to Greece which is where I'm originally from. Always love to head on over there this time of the year and spend time with family and friends. My kids thoroughly enjoy the beaches and every summer they make new friends plus they get to learn the language.

The trip over was a breeze, however, the return coincided with the London events and even though we didn't travel thru London but rather thru Zurich we felt the pain.

For those of you that travel with small kids you know what I'm talking about, especially when you have to wait for over an hour to go thru security screening. It got even worse in NY where we had to sit for 3 1/2 hours on the tarmac. By the time we got to Dallas we needed another vacation.

At least we made back safely and that's what matters.